Tuesday, November 16, 2010

Roomate Photos

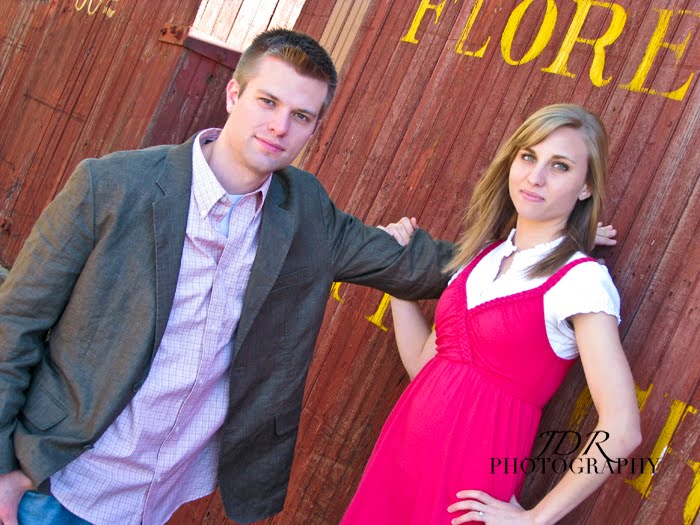
These girls asked me to take their roommate photos. It was pretty fun to work with these gals. Thanks chicas!


Thursday, October 21, 2010

Kenzie and Kayla's Senior Photos

These are my two sisters, Kenzie & Kayla. They are seniors this year, so we've been going out and taking photos. These are just the first few photos, so there's more to come!

Kenzie


Kenzie

Kayla

Kayla

Kenzie

Kayla

Kenzie


Kenzie

More to come...

Sunday, August 22, 2010

Jamie & Spence's Engagements

Spence and Jamie asked me to shoot their engagement photos, and I was a little nervous because I've never done anything that serious before. We took these photos up in Nevada City, which is great place for portraits. After fighting the wind most the afternoon we were finally able to get some great shots of these two. Congrats Spence and Jamie!


Monday, June 21, 2010

Fine Art

Car Fine Art
Enhancements: I edited this photo using camera RAW. I increased the saturation, clarity, and vibrance to boost the colors. Then I put the photo in the template that I created to display some of my work.

The template was easy to make. I created a new document in Photoshop, then drew a rectangle. I hit Command + T to active the transform tool, then held shift while clicking on the rectangle and dragging over. This created a duplicate of the rectangle. I hit enter to combine the two, then hit Shift + Control + Alt + Command all together 3 times, which created 3 more rectangles. After arranging the 5 rectangles where I wanted, I dragged my photo over to this template, sized it, then holding Option I clicked between the photo layer and the rectangles layer. This stuck the photo behind everything and you could see the photo through the rectangles. Then I just added my signature and my business name.

Original; May 2, 2010; 7:45 p.m.; Rexburg, ID; f/ 4.0; 1/250; Canon S5 IS

Barn Fine Art
Enhancements: I used camera RAW to boost the colors in the photo. I didn't do any other edits besides clarity, vibrance, and saturations.

Original; May 14, 2010; 7:45 p.m.; Ririe, ID; f/ 4.0; 1/250; Canon S5 IS

Sunday, June 13, 2010

Borders

The Manor; 5:45 p.m.; June 12, 2010; Nevada City, MT; f/ 4.0; 1/320; Canon S5 IS
Enhancements: This started out as a Camera RAW edit, but I didn't really like the colors. So then I turned it to sepia and added the border. For the border I downloaded a brush and using a Quickmask I made a stamp to create the border. I selected the inverse and hit delete. This created the edge effect around the picture. Then I just dressed it up with some text. This turned out a lot better than I imagined.

Train Car; 7:00 p.m.; June 12, 2010; Nevada City, MT; f/ 3.2; 1/100; Canon S5 IS
Enhancements: To create the border on this photo, I started by enhancing the original photo with Camera RAW. I added the Cutout and Poster Edges filters to create a painted look on the photo. Then I placed the image layer above a blank white layer. I then placed a layer mask on the image layer and filled it with white. Then using a thick heavy brush with the color set to black, I painted back the original even using random uneven strokes. I adjusted the opacity on on different strokes to give it more of a rustic look.


Barber Shop; 5:45 p.m.; June 12, 2010; Nevada City, MT; f/ 4.0; 1/500; Canon S5 IS
Enhancements: I began by adjusting the original image with Camera Raw. Then I created a new blank layer and set the background color to black. Then I used the Rectangular Marquee tool with 50px feathering to draw a box about 1/4 inch from the edge, and then hit delete. While I still had the selection active, created a duplicate layer and added a white stroke. Then I adjusted the opacity on black and white layers so they weren't too overpowering. It created an interesting burned edge.

Monday, June 7, 2010

Daily Photos

Grain Bins; 7:00 p.m.; June 7, 2010; Rexburg, ID; f/ 4.0; 1/800; Canon S5 IS
Enhancements: This one is out of order from the others because I had to come back and change a few things. I used Dynamic Photo to process this as a HDR photo. I used 3 different images at different exposures to created this photo. I increased the vivid colors and brightness a bit. I was really pleased at how well this one turned out. I used Program mode to take the shot.

Grainry 2- Exposure

Grainry 0 Exposure

Grainry 2+ Exposure

Trees; 7:30 p.m.; June 1, 2010; Rexburg, ID; f/ 4.0; 1/80; Canon S5 IS
Enhancements: I used levels and saturation to make the colors stand out more in this photo. I used Aperture Priority to take the shot.

Lemon Juicer; 3:30 p.m.; June 2, 2010; Egin, Idaho; f/ 3.5; 1/80; Canon S5 IS
Enhancements: I didn't do very much on this photo. I increased the the saturation and adjusted the hue a little bit so that the lemons really stuck out. I used Aperture Priority to take the shot.

Textbook; 9:00 p.m.; June 3, 2010; f/ 3.5; 1/60; Canon S5 IS
Enhancements: I increased the saturation, changed the hue, brightened it up a bit then added a vignette. I used Aperture Priority to take the shot.

Field Lines; 7:00 p.m.; June 4, 2010; Rexburg, ID; f/ 3.2; 1/60; Canon S5 IS
Enhancements: This has been a hard week to take outdoor shots because of all the rain we have been getting. On this photo I just adjusted the levels and increased the saturation. I used Aperture Priority to take the shot.

Peppers; 6:00 p.m.; June 5, 2010; Idaho Falls, ID; f/ 2.0; 1/100; Samsung cell phone
Enhancements: I was wandering around Fred Meyers when I saw these peppers. I didn't have my regular camera, so I used my cell phone to snap the shot. It isn't the absolute best quality, but it still turned out pretty good. All I did was increase the saturation, adjust the levels, and add a vignette.

Barrus Organ; 6:30 p.m.; June 6, 2010; Rexburg, ID; f/ 3.2; 0.3; Canon S5 IS
Enhancements: I used Camera RAW to edit this photo. I increased the clarity, saturation, and vibrance. I also increased the Red hues to help the red colors in the wood stand out a little bit. Then I added a vignette to give it a sharper look. I used Program mode to take the shot.


Sunday, May 16, 2010

Panoramics

Idaho Falls Temple; 2:00 p.m.; May 15, 2010; Idaho Falls, ID; f/4.0; 1/1000; Canon S5 IS
Enhancements: Increase saturation and adjusted levels


I was pretty happy with how this one turned out. I've never had a ton of luck taking panoramic photos, but for some reason everything worked out this time. For this pano, I stood across from the temple, and then shot each segment. I didn't use a tripod just because I seem to always have a weird arching effect when I do. Then I used the photomerge in Photoshop to stitch everything together, flattened the images, then used adjustment layers to increase the saturation and adjust the levels.

Idaho Falls Temple; 1:30 p.m.; May 15, 2010; Idaho Falls, ID; f/ 4.0; 1/800; Canon S5 IS
Enhancements: Increased saturation and adjusted levels


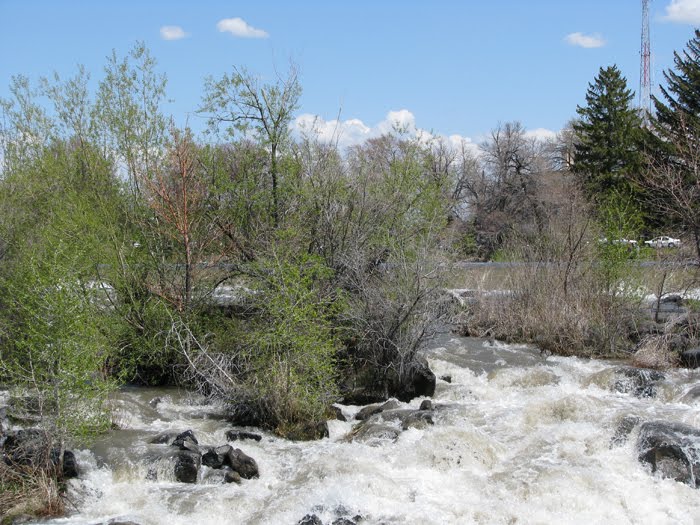
I took this photo down in Idaho Falls. I did several different angles and I liked this one the best. I took these photos in Program mode and then used Photoshop photomerge to stitch the photos together. After that I flattened the image, cropped it, and added adjustment layers to change the saturation and levels.

River Panoramic; 8:20 p.m.; May 14, 2010; Ririe, ID; f/ 4.0; 1/125; Canon S5 IS
Enhancements: Adjusted levels and increased saturations


When I was taking these pictures for this panoramic, I didn't think it was going to turn out very good. In the end it turned out better than I thought so I decided to include it. I used Photoshop photomerge to stitch the five different photos together. After that I cropped it and added adjustment levels to change the levels and saturation. I ended up having to save the final as a PNG because for some reason it was corrupt as a TIFF and a JPG. These shots were taken in Program mode.